Wednesday, 7 September 2011

(13) Control Lines - main sheet and sheetlets

I have now fitted the control lines and a bit of playing around before I launch.. so I will not assume anything until then but some observations, first the main sheet...
The main sheet set up is more complex than the normal single on a bermudian rig,  seperate lines are needed to control the yard, boom and each batten (referred to as "sheetlets") and in turn, by a series of blocks, to the main sheet, this seems complicated but are:
(1) Full reefs. When want to fully reef down (or stow the sail) you could simply release the halliard and the lot will fold down like a venician blind, good in an emergency, but if you did this there is a good chance that the sheets and sheetlets will tangle up and rehoisting will mean going out on the deck to sort the mess out... which defeats the aim of  not needing to leave the cabin.. so the sheet should be pulled in at the same time.
(2) Partial reefs, as the weather picks up the great thing of this type of reefing is that because of the simplicity, you just let go a panel at a time... you not need to anticipate the what sort of reefing you will need before you set off (as you would do with a bermudian jobbie)... cool eh? But what I am not sure of yet is if the weight of the battens (etc) that have been dropped is enough to hold it down or if the downward pull on the each sheetlet progressively holds the yard/batten down ?
(3) Finally, when sailing and you pull on the main sheet ,the same pressure needs to be applied to each sheetlet to avoid twists.
There are so many versions on how you can set it up, I have decided to keep it simple and see what happens... photo time!!

The new stern arrangement to keep the main sheet blocks and lines above the hood... I had two plates welded on to bolt the contraption to the pull-pit and enable the fitting of two wire strops to give a bit of lateral strength...


A close up showing the wires etc...


A close up of the deck fittings:


The sheet needs three seperate blocks on a mount (made from bolting a couple of aluminium angles together)....


Drill some holes add some shackles to attach the blocks and with a couple of "U" bolts, the lot was fixed to the stern gizzie..


I will add a picture of how the sheets n' sheetlets later!! In the meanwhile this is what my grandaughter Mia thinks about it...


Tuesday, 6 September 2011

(12) Fitting the sail and string... lots of it

Sail made... check.
Battens fitted.....check
Ropes .....

At the planning stage I drew up a "Rigging Warrent"... a simple spread-sheet ... to work out how much rope, blocks, thimbles, cleats etc.etc. I would need.... again the good old Practical Junkrig shines with examples and advice on rope sizes .... I supplemented this with some other improvements I picked up from the Junk Rig Association publications.... and trotted off to the goods old boat jumble and about 200mrs of string and other bits of hardware... it was go,go,go time...

After much fiddling about it was ready to hoist:


The big hoist...


Please ignore the tea stains down the side ... clomping around decks and cups of tea do'nt go together mate!!!
At this point there are just the "lifting" lines: halliards, lazy jacks and boom hoist.. I will go into the control lines later.....

Meanwhile, back to the sewing machine, I was very impressed with the idea of a combined sail catcher come lazy jacks come boom cover... so I bought 4mr acrylic canvas (1.5mr wide), 2 x 2mr zips, 3mr of 2" velcro and after only 2 days slaving away (I had thought it would take a couple of hours?!) ... total cost? about £80 ... it looks like this:


There are two pieces, one which is a square shape, the sail-catcher, that is permanently attached to the boom, the top of the catcher has zips inside and is reinforced with two wooden battens (1 1/2" x 1/2" coated with GRP) these are slotted into batten pockets and then tied to the lazy jack lines (through eye-lets):


When it is fitted it looks like this (ignore the white PVC, this was my temporary cover to keep the sails dry during the showers every 5 minutes!) also the lazy jack lines are temporariliy lashed to the catcher's battens...


The 2nd piece, the boom cover,  is zipped to the sail catcher when its "time to go home and drink beer and prattle on about sailing to your mates time" the shape is so...


When fitted together it looks like this...

 After the two bits are zipped together the front piece hangs over the sail, everthing, lines included are tucked away nice n' tidy and the two bottom seams and ends are closed by velcro strips, the final thing looks thike this:


One point to note... on conventional bermudian rigs the catcher is the full length of the boom, in this design it is only 1/2 the length of the boom....
why is that then, moosh, says you ?
Because, matie, the boom on a junk-rig is is fully adjustable, says I, the whole sail can be slid sideways, when running down-wind it is centred over the boat......none of that awful, dangerous, pitching and rolling rubbish you get with the bermudan set up where the sail is on one side of the boat.... so, if you had a full length catcher it would rub against the mast ? Yes/No? simples!!!

Now you are getting the idea why the junk rig is an advanced form of sailing compared to the conventional sailing arrangements!!!!


Sunday, 14 August 2011

(11) Bendy Battens and other clever stuff...

So, with the mast fitted, it's back to the sail...

Since the Practical Junk Rig book was written in the 70's,  there have been many developments......

The most important (in my opinion) are:
  • Putting a curve into the sail to induce an aerofoil effect and
  • Using a stainless steel cap fitting, fixed to the sail, on the batten ends to attach lines and so, with using eyelets to lash the sail to the batten, these completely eliminate the need for batten pockets, loops to attach lines etc,etc etc...
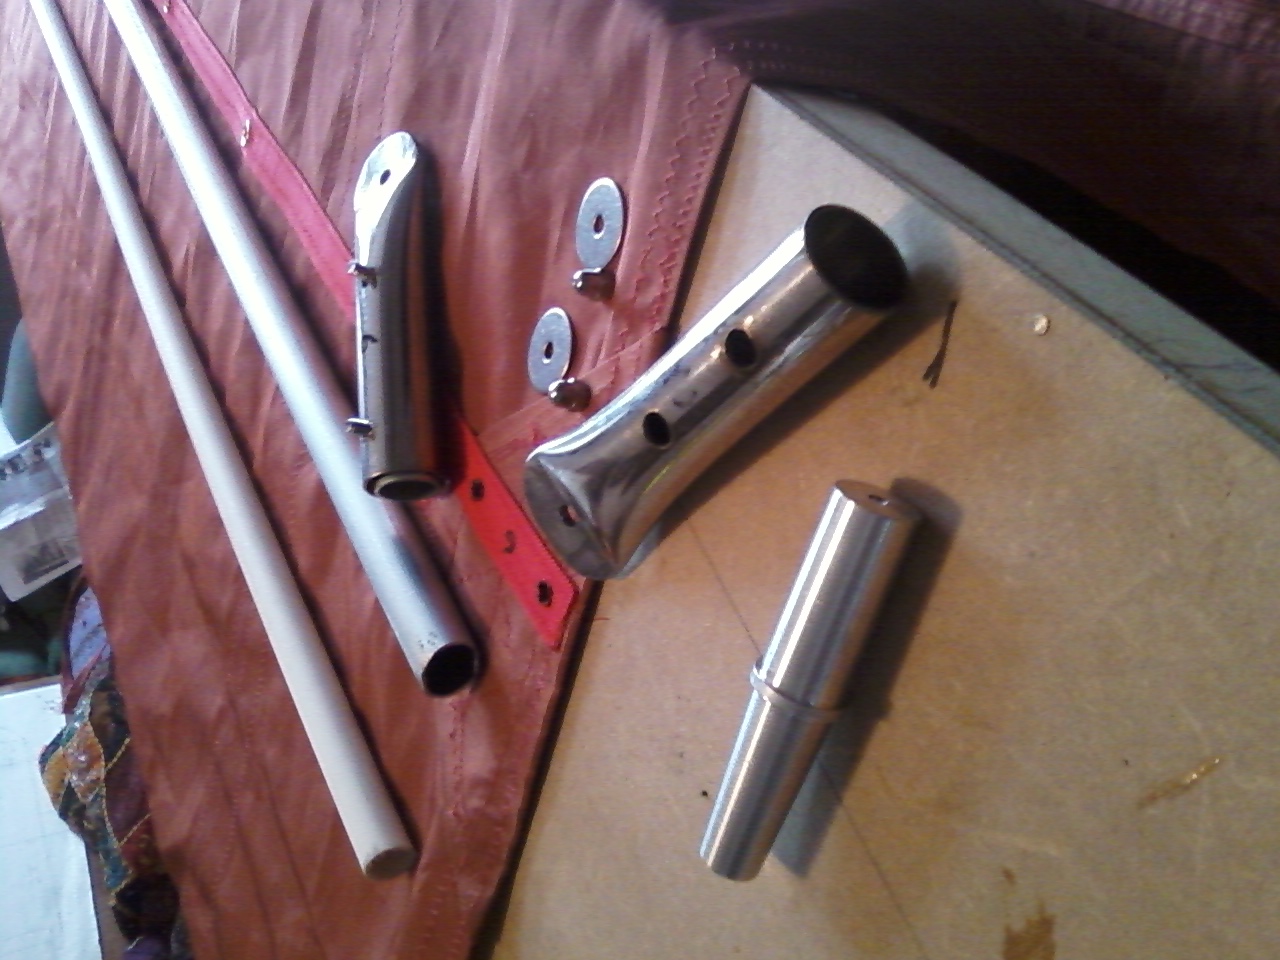
Lets look at the end caps first, you can buy thesefrom Sunbird Marine, but, like everything else on this project, I decided to make my own.. a bit faffing about and time consuming.....but hey ho: it's do-able, so.....

Home made batten cap ends recipe:

I used 1 1/8" internal dia stainless steel tube, 6" long, firstly, I flattened the ends in a vice....
the hero caught in the act:


then Supergit drilled a 8mm hole in the flat for a 5mm long shackle (i.e to attach the control lines)

then..
  • Drill  2 x 10mm holes at the top of pipe, and then two 6mm holes at the bottom of the tube
  • Drill a countersink into the bottom holes (from the inside) for bolts.

Attach to the sail by 6mm nuts with dome head nuts, sandwiched between two 1" SS repair washers (PS I also reinforced the sail with additional sailcloth panels...just to be sure!!)

Attach to sail...


ready to fit to the batten...


Slide in the 1" aluminium battens into cap and bobs-yer-wotsits job done!!
Note: to reduce the chemical reaction of having aluminium next to stainless steel, and make a tight fit, I wound the batten ends with white electrical PVC tape before inserting....


Then cook for 3/4 hour in a moderate gas setting .... nooooooo 'es getting carried away again moosh.......
  
So, "Inducing a curve to the sail"... why????

Apparently a major defect with the original junk rig sail design was being flat, they have no "lift", which is the effect caused by the wind flowing over an aerofoil shaped sail....
So, when compared to the conventional Bermudan type sail, tacking close to the wing is not very good, or
"Bleedin' crap upwind, Harry me old cock-sparrow"
...a highly original but technically correct term I believe, Alistair old chap....

However, if you could put a curve into the sails, so you do have an aerofoil effect... its a by jingo and a quick hearty wave as you steam along, thrashing along, overtaking the prats in the far inferior Bermudan type rigs.... dreams dreams oh hopeful dreams....

Note: if you contact Robin Blain at Sunbird marine, he can provide you an information pack (£25) that details many articles on the subject.. or join the Junk Rig Association (JRA), you can do this through the internet, then you can access their extensive library for free (good website advice forum too!)...

From investigation, and much advice from junkie types (sailors not druggies!), I have ignored using 'wishbone' type booms and battens and other super-dooper 'high-tec' solutions: they are all too bloody complicated and too much work for a simple soul like me ! ....

So, there are two much simpler approaches:
  • As with Bermudan sails, build in 'fullness' when the sail is designed and sewed...whilst  a very straight forward concept (details available through the JRA)......  it is well beyond my limited sewing capabilities... straight lines is about it for me innit, Guvnor !! or...
  • Cut the full length batten into 2 or 3 pieces and fit in tapered wedges. so, when the sail is lashed to the battens and batten ends fitted (above) a curve is induced.  Note: using wedges means rather than simply bending the batten means that the sail can flex and take up the same shape after tacking... the picky purist will say "3 corners do not a smooth curve make"...                   but from extensive wind tunnel tests, this makes no difference... so its yahboo to you bigheaded know-all, up yours and nah-na-de-nah-nah n' all that!
So, tapered wedges it is!!  The latest theory is, or maybe should I say one of many:

(1) Cut the battens at three points: 30%, 20% and 50% (measured from the luff),  when the tapered wedges are fitted this makes a shape very similar to an aircraft wing, tip-top-boo-ga-loo giving a nice smooth air flow...
(2) From the various wind tunnel tests and trials it would seem that the ideal curve is about 6 degrees.... I am led to beleive that this is worked out measuring the central point of the curve to the horizontal plane, divide one by the other add granny's age divide by two bees add the first number you think of etc etc ... in short, for thickos like me, simply jump to the last page and go with what they tells yer!!

Having sorted all that out technical stuff , you then find in practice that you can use double sided or single sided tapers.... you can buy these from Sunbird marine (aluminium) or make them from aluminium, GRP, nylon or wood .. this is an example of a home made wooden version (seen at the JRA rally)....


Looks good, but there's a problem Houston...it would seem that with wooden or nylon wedges, when you tack, the force can simply snap them in two, so I decided I would go for single 6 degree tapered aluminium wedges...one thought being that if I need to increase the angle or change to doubles, this could be done at a later stage...
So with the help of good ol' Bernie Godden (the bosun) and his trusty lathe, he produced the beasts (bottom RH corner)... what a fantastic job!!!


The final result, attached to the end caps and sail lashed on with 3mm line through the eyelets etc etc....

"Oooooo Harry, you can see the curve from 'ere"...


 Just one more point, apparently as the battens flex, the wedges rub against the batten, aluminium to aluminium, this can cause a 'orrible black stain on the sail, some sort of very flexible cover is needed, some have used plastic tubing, I thought of using some bicycle inner tube, but for now I have wound it with gaffer taper.....


Gypsy is a bit concerned that the battens might split at the join, rather than the taper snapping.... personally, I think she is barking up the wrong tree.... but we shall see?!! (The jokes are getting worse, Harry).....


Wednesday, 10 August 2011

(10) Fitting the mast

Rain stopped so back to the boat...  Fitting the mast time...
In the design, the mast needed raking astern. Although the wooden wedges between the mast and partner would allow some adjustment, I needed to make sure the position of the step and partner was near as possible.....

Step 1: make sure the boat is level...

I thought easy... make sure the white painted line between the top side and anti-fouling is level (I have always called this the boot strap, but I may be wrong?)... if so, everything should be OK...
I measured around and jacked up the boat. checked iit with a spirit level and it still was'nt bloody right... sod it...so I gave up and went home. .....
About 2am I woke up and thought "You-reek-a" and found that the dog had farted.... that was supposed to be a joke... sorry.... anyway....
I had an inspired thought:  For ages I have kept on meaning to move the fuel tank cos the boat leans to the starboard .. the result is that the water line is not level whem compared to the deck lineso the line aint level... nuptie or wot?!!
Answer: make a jig on the deck and then play around with jacking up the trailer with chocks etc and when that is level.. bingo! it worked...


Step 2. Make sure the deck partner and step are line up. I worked out where the mast should be, drilled a small hole, lined up the step... YES! Just to be sure I left the bolts loose on the step.


(3) Mark out where the partner will go


Cut the hole


Step 5. Check the rake is about right etc.... I had another idea: why not use a plastic drain soil-pipe (its about the right diameter)... a wiggle here there...seems OK!

Step 6. Glass in the partner. This was made from some left-over pieces of angled stainless steel and a bow roller that I had butchered for another gizzie, I made a GRP mould of the foot of the mast, mounted on marine ply and liberally slapped over with GRP woven rovings... Artie (my wife) says it would make a great wishing well for the garden (problem: no Gnome to go with it?) ... anyway this is what it looks like and for the finished product see below my loverlies...


Then leave it all with the pipe sticking out of the coach-roof and a  bin bag over it, because the bloody sky has opened up again.... Noah where are yer when I wants yer...

3 days later I returned to the scene of the crime to be greeted by a club member, JImmy  (name changed to protect the stupid) who asked:
"Are you fitting a wood burner, Chris Mate? they are Andy in Winter, mate innit through etc etc"..
 I could'nt resist it...
"Oh Yes, Jimmy, and the stack is adjustable too! you know, to improve the updraft in calm weather"
"Oooooo thats a good idea, mooosh, I would;nt have thought of that, my old cocker.." (bloodyidiot)
With that I went inside and with much gusto, joggled the soil-pipe up and down and side to side...
"Is it working Jimmy, mate??"
"Yeeeah.. I can see it moving: its really effective innit (Cooo look at that Bill, it's moving) etc etc"
Yes ... hmmmmm... say no more... this proves the rule: there is always someone at the back of the line when the brains were handed out... I had to laugh ha ha ha (yawn)... anyway.. where was I......

Step 7. Attach all the mast head running rigging, wire up the shackles smack on the aerial and navigation lights..and make sure you trim the cable tie .... I forgot... but I'm quite pleased as this is now my ingenious device for measuring the wind strength (well thats my excuse?!)
This caused me a bit of head scratching cos I could not get the damn wires to go through the inside of the damn mast... damn blast it, this thing is damn well blocked oh heck (or words to that effect)...
time to give up go home mister! then....
Flash...Another 2 am "senior" (senile?) moment........there must be packing inside the mast to stop the wires from clanging about.......
Yep, there was a line running through the mast with chunks of foam rubber tied on every 2 -3 ft... each piece slightly smaller as it neared to the top of the mast...what a really good idea!
but what I could'nt understand is why some burke then filled the damn void spaces with chips of vermiculite too (what a bloody mess) also some furry (or feathery) thing had made a nest in there too... its all go with yer junk-rigs innit, eh!!


Step 8 Lift in the mast... we are lucky to have a dedicatted mast lifting jig that fits the club's old tractor....this is a real museum piece, it was a airplane towing tractor from a 2nd world war american aircraft carrier, its had 4 engines and still going... well just, the engine is on its last legs it belches smoke n' rattles like a good un (awaiting engine no5!)... but back to the plot....
The only problem with a tapered un-stayed mast is there is nowhere to get a decent purchace...
in the end we made a sort of cradle by passing a rope through the bolt hole at the base (i.e where the mast is bolted to the step) with a few nifty knots, add Bernie-the-bosun, my brother Dave and 4 -5 willing members, a bit judicial F'ing and blindin' and bingo its there.

Step 9, Make sure it's all lined up and straight...
a simple way to do this is to use the halliard with a weight on it to make a plumb line...
this must be accompanied by 10 or so hangers-on making astute remarks like
"That Chris boy is swinging the lead again ho ho "
"Ear eeee's all about that rummer in-neee arghh-ah-ah-ha, Captm Jack" (yes Pirates of the Carra-been was cast from our memers!!)
"where's the bleedin' chimney gorne ?"
 "where's you chineese coolie 'at then moosh...It'll never work, Sid, put on the kettle ect etc.."
All very helpful but a little trying at times?!!


Step 10, Tap in the temporary wedges,  glass in the step, I know this lookes wrong but it will be OK , the final wedges will be made-to-fit, the distance between the top of the partnes and the bottom sheet (inside) is over 5" so...pinkies crossed.. all will be right on the night....

Temporary wedges

Drop the fibre glass cover in place with rubber gaiter...


Now admire the result from inside... note the glassed-in step (bolted into the deck)


Outside...


Admiring the sun setting after a busy day at the Portsmouth Harbour Cruising Association....

By Artie Vossel-Newman


Gypsy the dog's vote of approval ??


Monday, 8 August 2011

(9) Making t' Sail

Having blown my mind on glass-fibre juice and day after day of rainrain n' more rain, I decided to make a start on the sail.
I hunted around for 5.5 Tan Dacron and after finding it's over £15 a metre, getting it for less than £4 a metre through E-Bay made my day... I used the PJR and the standard Haslar type design.. its simple with parallel luff n' leach's, same size battens etc etc so very simple... size? from looking at similar size boats it seems that the average was about the 260 - 270 sq ft with a maximum of about 300... I opted for about 265... but having chundered on about this in earlier blogs I will just show some pictures!!!
First make a 5mr long table... with sewing machine built in ...


The panels are fixed together with double sided tape and rolled up so they can fit through the throat of the sewing machine


Sewing..the pegs are handy to keep the rolls together

The seams are all zigzag with polystyrene 80 upholstery grade thread.. I found that leather needles were great allowing up to 4 layers to be sewed together... the only problem was the weight and size prevented the sewing machine foot to feed the cloth evenly... remedy? don't look too closely: they are less than perfect!!
Sail completed and eyelets added for lashing on the battens...I discarded using batten pockets, apparently they are a pain to sew on and wear very quickly. I used 1/4" eyelets for the battens and 1/2" for the tacks etc.. each batten has a layer of 1" polyester (red) webbing on the sail tp prevent wear etc

Sunday, 31 July 2011

(8) Preparing to fit the Mast... Reinforcing the Cabin bulkheads and roof.

I decided to make the mast step and partner out of GRP and stainless steel... fitting them would result in most of the alterations on Bobtail..
Whese areas are where most of the stresses would be... as there are no stays, all the strains are on the partner and step, so there could be no weaknesses...

One of my recurring nightmares is when I am trotting up the harbour at great knotts and a squall hits, a huge crack and the top of the cabin disappears with the mast! Cabriolet cabin.... ohhh nooooooo.... So, given the absence of any technical data when the boat was built etc, it was a case of common sense and a great big dollop of over-engineering!

When you look at sailing, everything is see-saws n' fulcrums... this is no different, the partner/coach-roof takes mainly the sideways/lateral strains.. but just a few wooden wedges between the mast and the partner? hmmmm..... and the keel step takes most of the vertical stresses.... just a bolt through the mast/step? No wonder you get nightmares moosh!

The distance between the top of the keel to the coach roof... the Bury....is critical, according to the good book, the minimum needed would be about 2ft, as we have over 6ft, this is really good news. The larger the distance the more it reduces the sideways leverage effect of the mast on the roof.
Whilst that was the good news, the bad news was that all the bulkheads are pierced by large windows, as these have no value stress-wise, the result is that all these lateral strains would be concentrated onto three very small, thin, GRP corners and the gaps between the windows...

To overcome this I beefed up the corners with plywood knees, fitted a new bulkhead across the cabin (just behind where the mast partner would go) and whacked some wooden cross pieces between all. These were all glassed in (3 layers GRP, normal wovings).

So some pictures!!

Before!


Knees fitted


Knees in centre and new bulkhead

New bulkhead (dont look at the drips?!)

(7) Fitting the Hatch

So, enough gassing: it's work time chaps n' chappesses... Fitting of yer hatch. … This was a pretty straight forward job : the preparation by reinforcing the doghouse bulkheads etc, then cutting the hole and fitting the hatch, a handful of nuts n'bolts, a load mastic and bingo... job done! 

What takes the time is all the nausea of moving various bits of wiring, handrails, music speakers (most important that the stereo sound is OK, innit wot?) and the altering and replacing the head lining... so a few piccies... the last one shows the chunk taken out of the roof... I kid-you-not the construction, balsa sandwiched between GRP,  was well over an inch thick!